

The common thing I hear and see is, most YouTubers don't like the editing process, (I personally don't mind it) many people don't realise that filming and making the project itself is usually the quick part. Editing can some times be 4 or 5 time longer than filming and making the actual project. But here are some tips and tricks to help both speeds your editing and make things go a little bit more smoothly.
Many of the tips will be during the actual shooting process that will speed up your overall editing process and hopefully make things run a bit smoother and quicker. However, there is no magic computer wiz-bang button that you can push to do it all for you. yet ;-)
Save and Save Again
My first and most important tip is to regularly save your project it will save you from any frustration of any computer crash or application crash that may or may not happen. And I mean regularly probably 3 or 4 times as much as you are already doing. It's an age-old thing in the computer world... save and save again.
Also, get into the habit, save before you are going to do a special edit or effect, and then save again after it is done.
If your application of choice has autosave... use it. It has saved my butt on a number of occasions. Many autosave also does not overwrite the last save which means you also have to a degree a rollback feature and you can open a different edit or version if so desired. This not the best for this and some of the higher-end editors have this feature built-in but lower end editors it is better than nothing.
Organisation
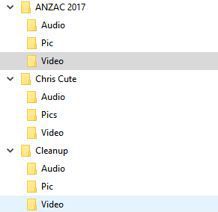
The next tips I have are about organisation of your files. From what I have seen people tend to throw all their files into a single folder. However, it makes things easier to find and follow if you break these into subfolders. Audio, Pics, Video. And then insert the relevant files into these folders.
If you have certain files you use in every video, ie; logos, music, and sound effects, intro and outros etc, then make a separate folder from the project with all these files in there. Making them easy to find each video you make.
Folders and Sub Folders
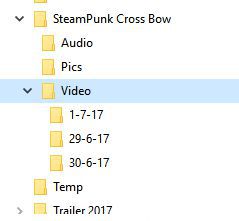
If your shoot is over a couple of days then you can break these subfolders down even further. Especially the video folder with subfolders of the date of shooting and again put the relevant videos in the correct folders. This makes it so much easier to keep a visual track on what files you have, and where they are for the current project and when they were shot or filmed.
If the project is over a couple of days then break these folders down even further in the days of the shoot.
This can help with two things, firstly and probably the one that will speed your process up is when you come to edit said video you are only searching through that day's worth of videos, not the entire project to find the particular video clip you are after.
Secondly, some cameras and their numbering system can be confusing, as well as some like Nikon once you empty the SD card the camera will start the numbering cycle from the start again, and you have to go through and rename files. However, if you are doing a project over a couple of days putting the footage of that day in its own folder and the following days footage into its own folder it means they won't overwrite or interfere with each other.
Extra Folders
In your overall projects folder where you keep all your past and current project files make two folders. 1st one to make is "temp" and the 2nd one "Export"
Now, most video editing applications have in their settings a function called "AutoSave" my advice is to use it and direct the autosave to your newly created "temp" folder. Set the time to every 5 minutes. This way if you do have a program crash between your regular saving and auto save you won't loose to much of your project.
The "Export" folder is where you should export your final project too. This way it is clear of your project files quick and easy to find to do a final preview and if you need to render another version you can safely delete it without accidentally deleting the projects files by accident.
Short Cut or Hot Keys
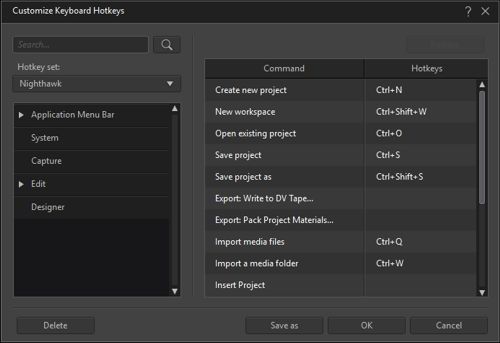
Learn as many of the program short cut keys as you can like the standard ctrl+z (undo), ctrl+x (cut), ctrl+c (copy), ctrl+v (paste), and most likely ctrl+s (save) most video editing applications have many more and many you will be able to set yourself. knowing these can simply speed up the entire process.
Many of the programs like "Da Vinci Resolve", "HitFilm", "Adobe Premiere", "CyberLink Power Director", "Corel Video Studio", "Sony Vegas" etc are capable editors and have the ability to set the hotkey as you wish.
Example find what keys are your next frame and the previous frame... use the hotkeys instead of using you mouse and pushing the button in the editor frame. This alone speeds things up. Your next keys to work out would be marked in and mark out and cut or split...
Once you learn these use them, as it quicker to use a short cut key than it is to navigate and find the command on the menu system.
You find that you will use a few regularly over and over which will speed up the process.
Edit in sections
Don't wait till your project is completed before you start the editing process especially if it is a couple of days worth of footage to dredge through. It becomes a daunting task then. Start editing ASAP while the glue is drying or at the end of the days shooting.
This is for a variety of reasons. First, the project and the task ahead is not as large and is not so daunting. Also if you break it into smaller sections you will only have a few files to work with. The transfer quicker. There is less strain copying the files over. And most importantly it is still fresh in your memory which takes you less time to sort what parts to edit out.
Film in Short Takes
As the title suggest film in short takes. This is for many reasons but the main reason I will cover here is speed. It will speed your editing up. If your footage is a couple of minutes long then it is quick and easy to find the points you want to edit out.
If on the other hand, the file is 15-20 minutes long etc, then it takes a longer time to transfer that file to your computer, it takes longer to find the parts you want, it takes longer overall to edit. It takes a long time to process and some older computers may struggle to add to the frustration factor.
If I am making constant mistakes chatting to the camera I will stop and delete that footage from the camera and will take a short break before I come back and give it another go.
Think of editing when filming
When you do your filming think of the editing process.
- Check that you have the lighting you want for the effect you are after. It means fewer effects you have to add during the edit...
- Make sure you are on-screen or project is. Think of the thirds. Fewer reshoots and less zooming and editing to try and correct the position. And you can only do so much in post edit.
- Check your sound, mic position. (ensure switched on and has good power)
- Is this part of the make, really needed for the video ie; I don't need to see you make 30 cuts of the same cut. Maybe cut and film couple, both at different angles and during your edit you use this as a jump cut to make look like you had two cameras's going.
- Film a couple of "Cut Away" shots or "B Roll shots" that can be used to hide a few "ummms and arrrrgh" and other sins of filming. "Cutaways" or "B Rolls" also help hide jump cuts.
- Think about the shot beforehand, is the camera in the way of the cut etc.
- If talking to the camera and you are making a multiple Bloopers stop camera delete that footage, take a breather and start again... Once you get it right at the end of it put a marker in your filming by saying "this the take"
- As above film in sections...
Filming a long static shot can become boring so;
- If you want close-ups of your shot... move the camera closer don't zoom.
- Move your camera to different angles regularly. If you have a second camera set it up and use it. Try to get different angles and clip them together. While angles change scene don't make it to confusing and overdoing it.
- Get lots cutaway shots that can be used as a B roll... (can be used for many things from fix errors to breaking up a long shot)
- If you can add a small amount of smooth motion to the odd clip will break the monopoly of a static shot.
MultiTask
When rendering or downloading the footage from your camera to your computer, you don't need to sit there and watch it or babysit it. Go make your thumbnail for YouTube or start typing up your description or accompanying article go make the bed, make a coffee, seriously you don't need to sit and watch it.
Hardware
Now, this section I am only going to lightly touch on because it means you have to invest in some hardware. That costs money, BUT if you find that you are enjoying your self I do suggest in a few hardware upgrades that can not only speed your editing process up but make a little more pleasant
Video Graphics Card
Having a good VGC can make the difference of throwing your computer across the room because it can not keep up with your editing or it can help you streamline your editing process and you not having buffering or lagging during the edit.
Editing videos can be heavy on your computer's resources, especially once you start adding filters and effects to your clips. A good Graphics Card with onboard RAM can help with this
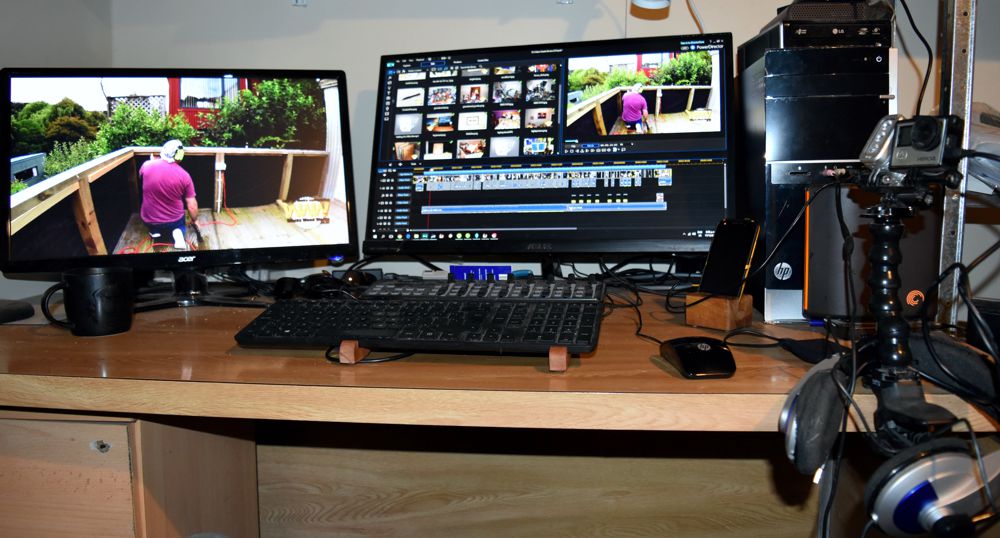
Second (Dual) Monitor
If your computer can have dual monitors then I highly recommend having dual monitors. They don't have to be matching and even the same size... just having dual monitors can make editing that tiny bit more enjoyable.
Dual monitors allow you to have one as a preview monitor and the other as an editing screen. Depending on your editing software you use you can layout the app as required to suit your requirements and wants. Not only for video editing but just in computing in general. I would be totally lost without my dual screens.
RAM (Random Access Memory)
More RAM can speed the final rendering times as well as speed the program up in general. So if you can put more RAM in, do it. It will help with other things you do on the computer as well. My PC has 32GB which in today's world is average and has 4GB on the video card.
On the subject of RAM, while editing doesn't do what I do and have half a dozen other programs open and running in the background. It can cause conflicts and crashes and make the computer sluggish to operate.
Programmable keys
This one really only if you are truly getting into it and willing to spend a bit of money.
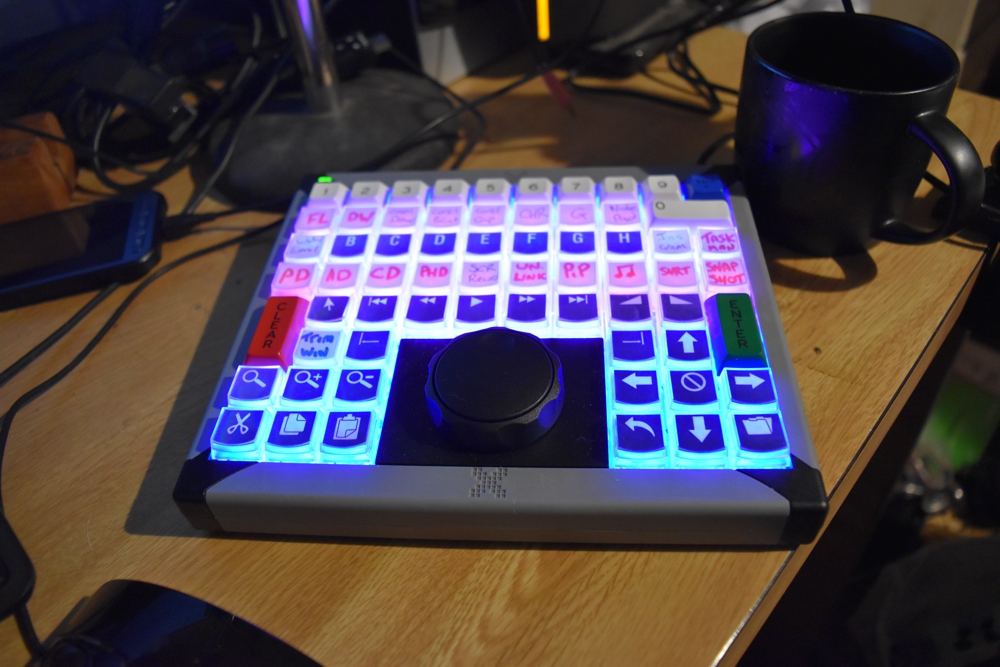
There are many types of programmable keys you can get that are on the market. Some are primarily set up for video editing and others are for anything you wish. I personally have X-Keys XK-68+Jog/Shuttle. and just having the jog shuttle wheel alone has saved so much time in editing. The downside is there is another small learning curve to make it do the basics. But if you are willing to spend more time or money you can get the programmed to do so pretty cool stuff at the touch of a button.
As I said there are different types from a programmable mouse, to a smaller version of the XK-68 to a single row of buttons... even a single button.
It truly depends on how much you are will to invest and what you are truly after.
In conjunction with remembering the short cut keys, these units can be programmed to do simple tasks like a short cut keys macro or a more complicated task that is repeatedly done.

Now I am not saying simply go out and buy one of these they are not cheap, but I use mine for video editing as well as within my music-making application. It is also set to quick start the main programs I use.
I also use the Elgato stream deck which can also have programmable hotkeys. This one also changes state depending on the program I am in so for example if I am in HitFilm it will change profile to my HitFilm hotkeys I have set up and if I switch back to FL Studio it will switch to My FL Studio profile and Hotkeys. This also has helped my entire workflow not just in video editing.
The good thing is that these are fully customisable to meet your workflow. But there is a bit of a learning curve to what they can and can not do...
And to get the advanced features to work with the X-Keys you do need to know visual basic. But to get to do what I have it doing is pretty simple.
Using these two pieces of hardware with and in conjunction with AutoHotKey is the biggest time saver on many levels. So for an example, you could program you to automate just about anything. there is no shortcut key (or hotkey) and I have to click move mouse click open sub-menu click open new window type and click I will probably try and work out an AutoHotkey script or a X-Keys Macro for it to do it all for me

